This story was provided by The Local Moms Network contributor, Maria Provenzano, Lifestyle + DIY Expert of Hallmark’s Home and Family and founder of From Scratch.
Searching for some creative and fun ways to celebrate Valentine’s with your little ones this year? Well, as a self-appointed Valentine’s Day representative and real life craft expert, I’ve got you VERY covered! It can be tricky to find crafts that toddlers and little kids can handle but with a little help, your tot can totally tackle these simple (and adorable) V-Day craft projects!

Let your love take flight with these easy to craft DIY candy airplanes. Follow the instructions below to create a special Valentine’s Day crafty treat with your little one! Click here for even more creative and easy Valentine’s Day gifts!
Materials and Ingredients for Candy Airplanes:
- Hair tie
- Gum
- Smarties
- Mints
- Heart Stickers
Directions for Candy Airplanes:
- Take 2 pieces of gum and wrap scrapbook paper around the gum pieces
- Next, take a hair tie and string it through two circular mints
- Set your Smarties candy in the middle of the two mints
- Flip the hair tie over the wings aka the gum piece
- For a final touch put a little heart sticker on the top!
This craft is a crowd pleaser and thankfully pretty foolproof! All you need to do is help your little one cut some crepe paper and attach it to a tiny lunch bag. Add some googly eyes and antennas to turn them into a “love bug.”
Fill it with your kids candy of choice or my personal favorites — these adorable Valentine’s Day Conversation Heart Cookies or my famous Pink Popcorn — for a special Valentine’s Day keepsake!
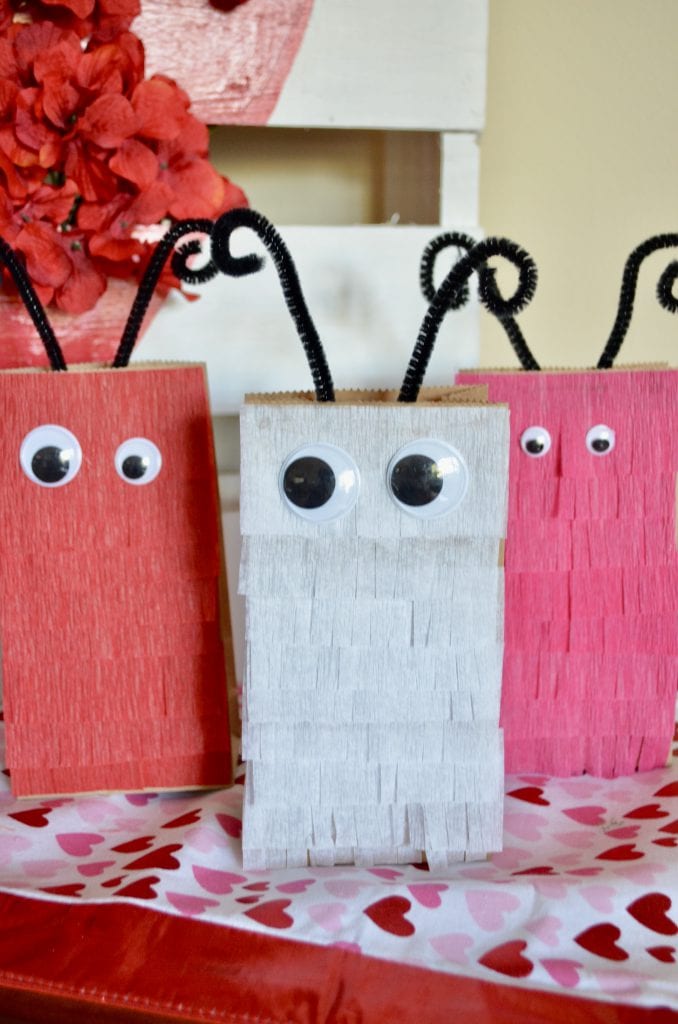
Materials for DIY Fringed Bags:
Crepe paper (aka party streamers); colors will vary depending on which look you choose
Scissors
Double-sided tape, or glue
Small (or large) brown paper bags
Googly eyes; for the Love Bug
Pipe cleaners for the Love Bug antennas
Directions for DIY Fringed Bags:
*Cut the crepe paper to the same size as the width of the bag
*Use the scissors to cut fringe into one side of the crepe paper leaving about a 1/4-1/2 inch uncut at the top
*To speed up the process, you can cut about 3 sheets at a time
*Place the double-sided tape, or glue, on the uncut part of the crepe paper
*Place onto the brown bag, starting at the bottom, and working your way up
*Repeat until the entire bag is covered
*Fill with candy, and use tape to secure the bag shut; optional
*Either add a heart on the front (tutorial here) OR use the glue gun to add the eyes to the front of the bag and the antennas to the back of the bag
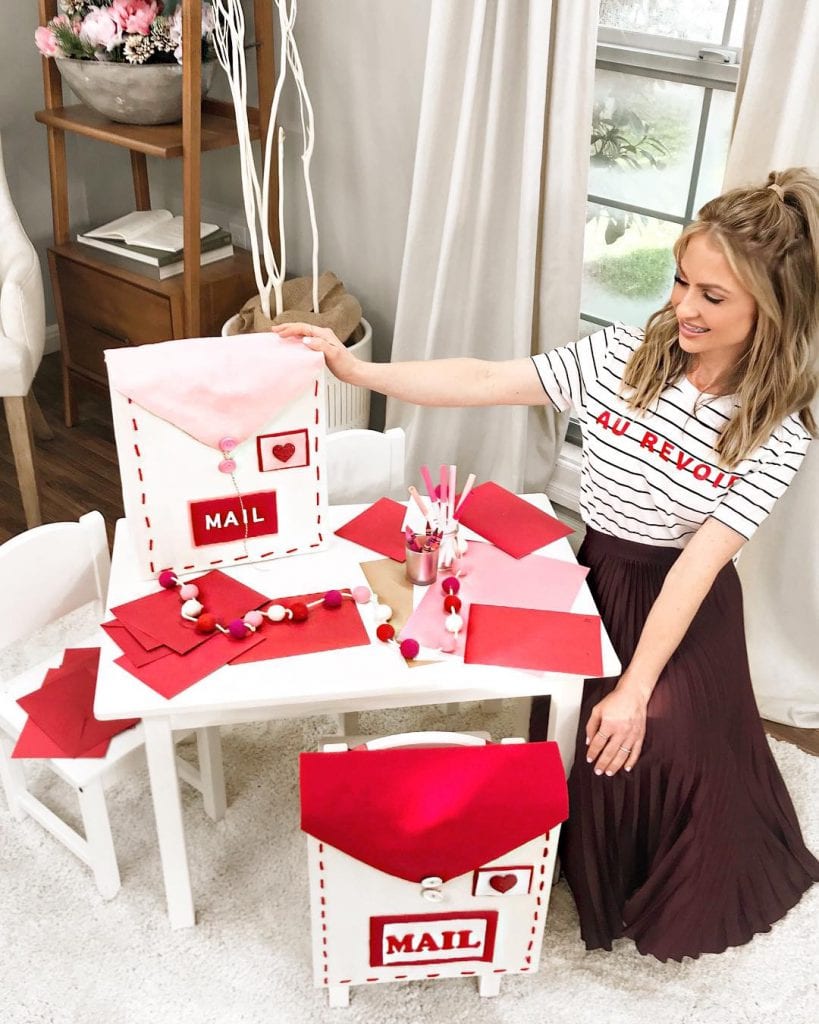
Ready to step up your game when it’s your kids’ turn to bring the Valentine’s Day box to school? This project looks impressive but is very simple. All you really need is some fabric, a box, and a whole lotta love! Keep reading for the how-to’s!

Materials for DIY Valentine’s Day Mail Carrier
- Cardboard Shipping Box
- Canvas
- Felt
- Spray Adhesive
- Awl
- Yarn or Thread
- Iron-On Letters
- Iron
- Buttons
Directions for DIY Valentine’s Day Mail Carrier
- Pick the size shipping box you’d like to use. You’re ideally looking for a thinner rectangular one.
- On the top end, find where the middle of the width is and cut a triangle out of the top of your box, giving it an “envelope” look.
- Using spray adhesive cover your box with the canvas. I wrapped it like a present so that I could create neat lines. Cut away any excess, and the top that hangs over the triangular cut leaving a little bit extra to fold inside the box.
- Using an awl, poke holes through the canvas and cardboard around the perimeter of your box to give a pattern for the “stitching.”
- Using a large needle and thread, weave your yarn in and out of the holes you created, making it look like a stitch pattern. Glue the ends of the yarn to the inside of the box.
- Cut the end of a felt rectangle to give it the pointed envelope look. Leave it long enough to let it hang over the opening of the box, and glue the top/back of the box. Add a button and piece of yarn if you want the envelope to “shut” completely.
- Add little details to the outside of your box to personalize it. I added a little felt square with a heart on it to make it look like a stamp! You can also use iron-on letters and felt to label it with a name!
- To hang, cut two long strips of felt and glue the ends to the back of the box, making it look like a backpack. You can use these straps to hang it off your chair!
If you’re looking for more ways to celebrate LOVE this month, I’ve included some of my favorite ideas to use for a simple but festive celebration at home with your family, hubby or gal pals:
And, for more Valentine’s Day and ANY day craft ideas for kids sign-up for my weekly newsletter by heading to From Scratch with Maria. Wishing you lots of love!